


* Applies also to installing Windows 10 and installing on X220 which is not a Tablet but a regular one.
The purpose of this instruction is to provide information in one place on how to do this so that all the keyboard functionality and the necessary Lenovo utilities work. Information is scattered on various forums where people solved specific problems and studying the entire array of information takes a lot of time.
The instructions were written as a result of a 3-week study of issues related to setting up a laptop for systems not supported by the manufacturer, numerous reinstallations and testing. Once upon a time, similar instructions for the Lenovo W500 laptop helped me a lot (How to install Windows 10 on Lenovo T500 https://win10-on-t500.blogspot.com/) and I decided to thank the community with the result of my work, so that you do not waste time
Lenovo, while supporting the product life cycle, when it releases a new product (usually with worse performance characteristics, less convenient, more fragile) for outdated PCs, sometimes releases new drivers, which essentially make traditional laptops unusable or difficult to use. A striking example is the Hotkey update for Windows 8 for the X220 Tablet, after which the ability to mute the microphone with the corresponding button, or turn off Bluetooth instead of WiFi, is lost. Or errors appear that “Lenovo Settings is not installed,” which is no longer in the Microsoft Store. As a result, the user thinks that the device no longer works and goes to the store to buy a new laptop, and the Lenovo marketer receives a bonus for this. From a business point of view, selling you five laptops instead of one is certainly good. From the buyer's point of view, overpaying five times is bad. From the point of view of the planet and the environment, sending 4 normal working devices to a landfill is also bad. This is how capital works, but sooner or later, I hope, laws will be passed around the world that directly prohibit the production of “disposable” products in cases where this is not justified and the provision of support is minimal for at least 10 years. In this regard, approximately 10 years of support Apple's products can serve as an example for many. I'm not an Apple fan, if anything))) Well, almost)))
The laptop itself is still good for office work or car diagnostics, which is why I took it for my old Peugeot-307SW, because... the interior there is small and with a W500 without a touch screen it is not very convenient to work in Peugeot Planet. Well, I liked the touch screen - sometimes you can draw something or watch a movie like on a tablet.
The instructions will not provide links to specific drivers, because... Lenovo often changes their location on the site, and also removes some and adds others. You will need to find and download the installation files, scan them with an antivirus and at the very end download Lenovo Vantage from the Microsoft Store and say “Yes” to downloading the additional package. On Windows 10 this will display a large green battery icon (as it used to be in Power Manager), on Windows 11 it will just be a round icon.
The information is provided as of December 23, 2023, there will be comments and constructive criticism.
Tables of contents
- Download files
- Preparation
- Installing Windows 11 (10)
- Installing drivers
- Installing utilites
- Installing and configuring Hotkey
- Touch screen control keys
Before installation, we will create a small archive of drivers and programs
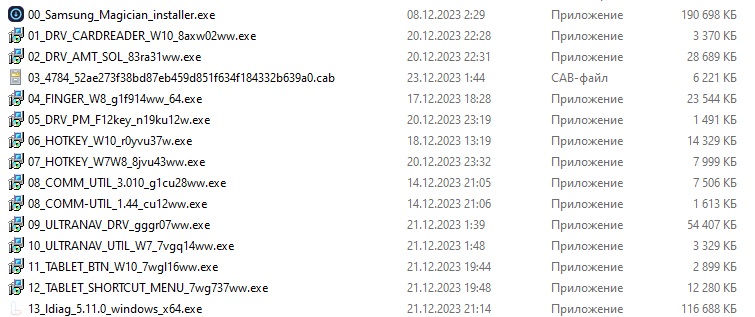
Download files
- 4784_52ae273f38bd87eb459d851f634f184332b639a0.cab - if you need a single-on login (when a switched-off laptop turns on and logs into a password-protected account with one finger scan. This file can be downloaded from https://www.catalog.update.microsoft.co ... anced+mode, +for 2010 year sorting the list by date, this is the most recent for this year.This is the UPEK 1.4.0.275 sensor driver, perhaps the only one that correctly passes the scan to Windows for automatic login.
- 8axw02ww.exe - Ricoh Media Card Reader Driver for Windows 10(8) x32/x64. Unpacks into C:\DRIVERS\WIN\Multicard, can be installed immediately;
- 83ra31ww.exe - Intel Management Engine Interface 7.1 and Serial Over LAN (SOL) driver for Windows 8(7) x32/x64, unpacked to C:\DRIVERS\WIN\AMT, no need to install right away, then update the serial driver from the device manager PCI port with ID PCI\VEN_8086&DEV_1C3D&SUBSYS_21DB17AA&REV_04;
- g1f914ww_64.exe - Fingerprint Software Windows 8 (Windows 10 not work), unpacked to C:\SWTOOLS\DRIVERS\TFS\g1f914ww_64;
- n19ku12w.exe - PM driver (for {Fn}+{F12}) Windows 8 x64, unpacked to C:\DRIVERS\WIN\PMDriver;
- 8jvu43ww.exe - Hotkey Windows 8(7) x32/x64, unpacked to C:\DRIVERS\HOTKEY;
- vodka and a bear are necessary things for work. The vodka is unpacked inside and the bear outside. Vodka relieves stress during installation, and the bear nearby motivates you to do everything as quickly as possible and run away. If anyone doesn't understand, this is a joke, of course;
- g1cu28ww.exe - Communication Utility (Camera, mic), utility version 3.0.10, unpacked into C:\DRIVERS\WIN\COMMUTIL. You must first install Net Framework 3.5. You can install the older utility version 1.44 if you are used to it (cu12ww.exe);
- dotNetFx35setup.exe - Net Framework 3.5;
- r0yvu37w.exe - Hotkey Windows 10 x32/x64, unpacked to C:\DRIVERS\HOTKEY\20232112.0035450, this utility does not work correctly on the X220Tablet, it is only needed to register the paths in the registry necessary for further settings. After installation, its files should be overwritten by the older 8jvu43ww.exe;
- gggr07ww.exe - touchpad and joystick control driver for Windows 10, version 19.0.17.142, unpacked to C:\DRIVERS\WIN\UNAV\20232112.01414257;
- 7vgq14ww.exe - a utility for quickly switching joystick-touchpad, unpacked into C:\DRIVERS\WIN\UNAVUTIL, installation is launched from the CMD window with admin rights, because the group of certificates with which it was signed has been revoked;
- 7wgl16ww.exe - screen rotation button driver, unpacked to C:\DRIVERS\WIN\TBBTN;
- 7wg737ww.exe - a utility that rotates the screen to a specified position in panel mode, unpacked into c:\swtools\readyapps\tbltctr;
- ldiag_5.11.0_windows_x64.exe - an original program for diagnosing hardware.
Upd. Or, download all software by one zip - https://drive.google.com/file/d/19uG2bF ... p=sharing
List drivers.jpg
Preparation
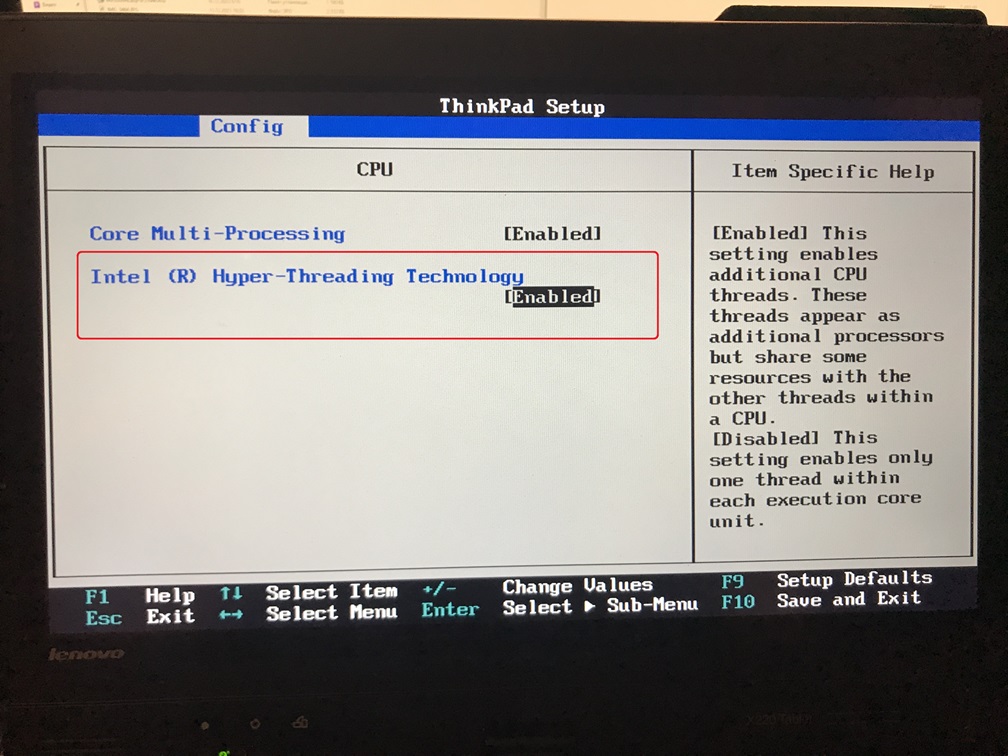
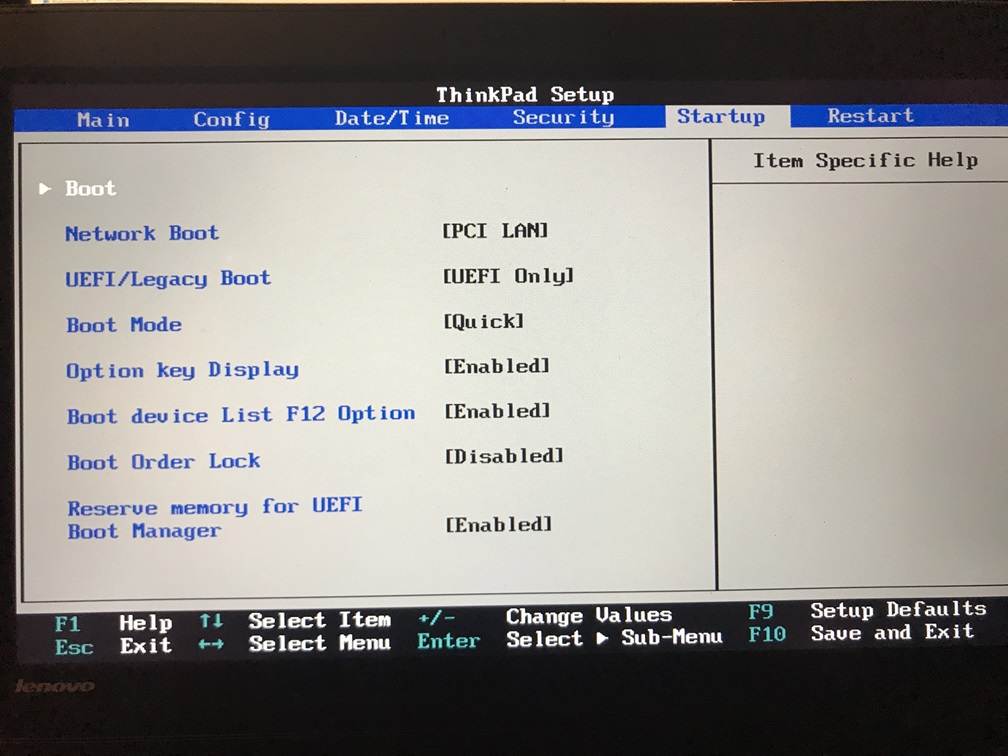
You need to make preparations in the BIOS, first of all update it to version 1.46, and then change some of the settings - enable virtualization (Fig. 01), UEFI boot (Fig. 02) so that the disk is formatted in GPT. A disk with the GPT file system is very reliable (in my experience, a GPT partition was lost only once, and the MBR was lost about a dozen times, mostly on Windows 7). You also need to enable the auto-login settings for your Windows account in the Fingerprint section and clear the sensor memory. I also cleaned the TPM chip before installing from Windows.
Installing Windows 11 (10)
Windows 10 and 11 install fine on Lenovo X220 Tablet, but they need a little help)
1. Only for Windows 11 - when the installation program says that it is impossible to install the system on this computer, press {Shift}+{F10} and in the CMD window that appears, type regedit to launch the registry editor. In the editor, go to HKLM\System\Setup and create a LabConfig section there, inside which we create keys like Dword32 BypassSecureBootCheck, BypassCPUCheck and for those laptops where TPM is disabled - BypassTMPCheck. In all keys we set the value 1, then close the registry editor and the CMD window, take a step back and then forward, continuing the installation.
2. IMPORTANT! If you need Bitlocker encryption, you have TPM enabled and you have a Samsung SSD drive, then after the installation is complete, you need to immediately install Magician software, enable encryption preparation in its settings and then enable Bitlocker. If you don’t do this and start installing programs, then hardware encryption cannot be enabled on the system disk in the future! After the reboot, you need to wait until the disk encryption is completed until the next reboot (the encryption icon hangs in the hidden part of the system tray while encryption is in progress), but you can download updates in parallel.
Installing drivers
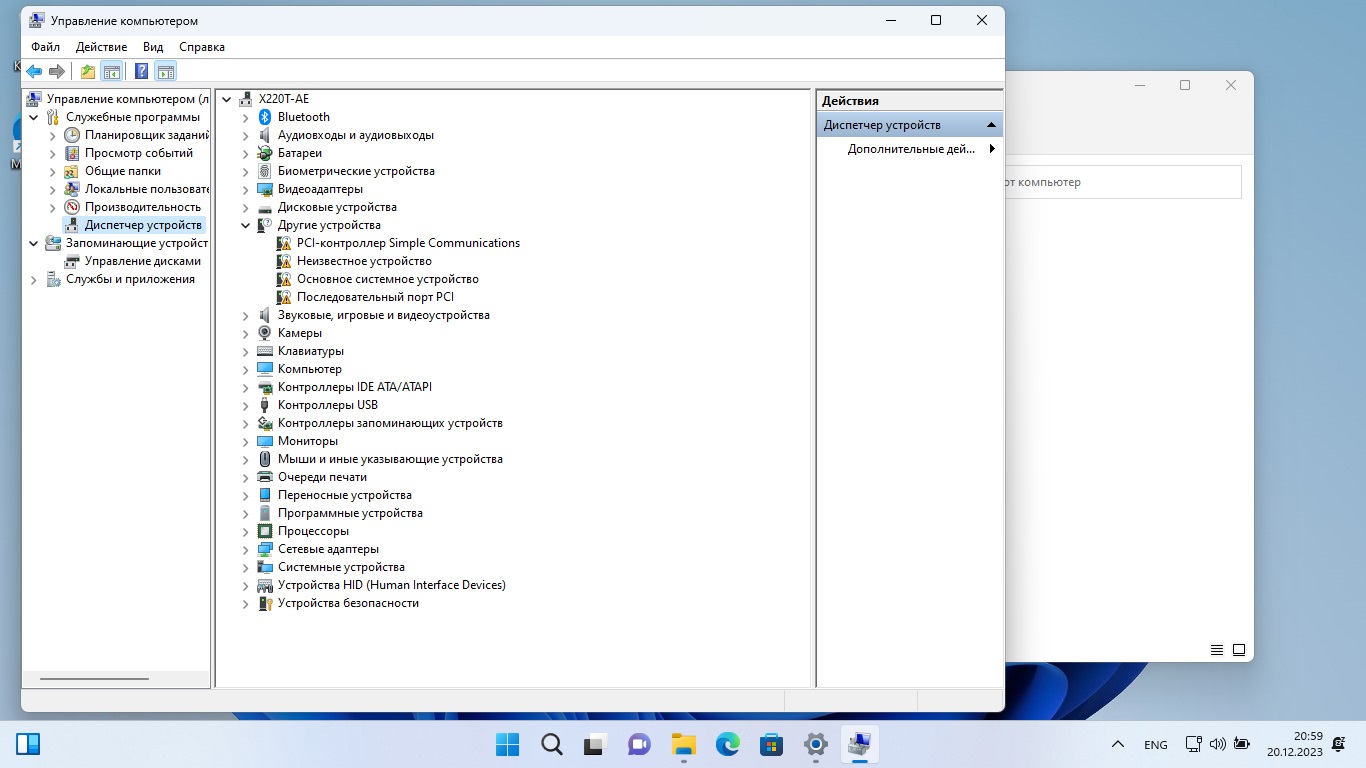
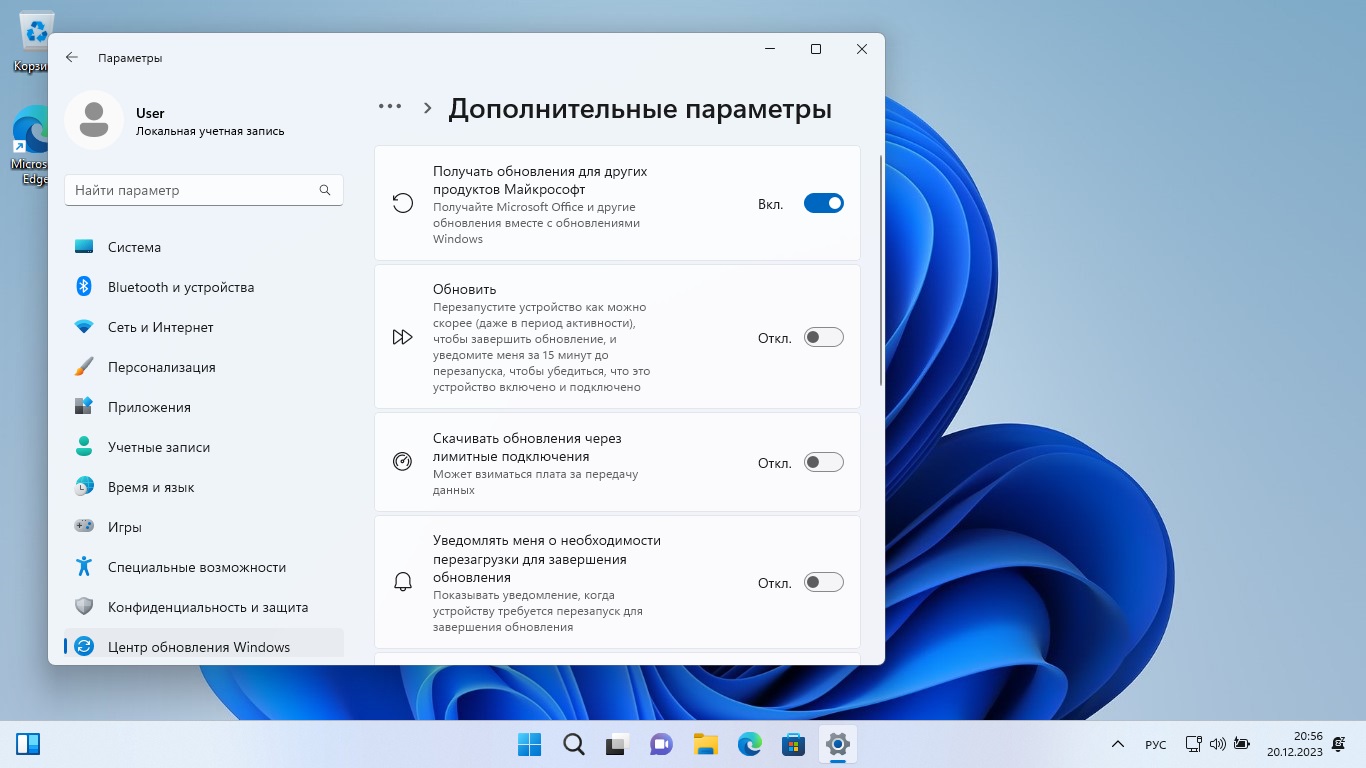
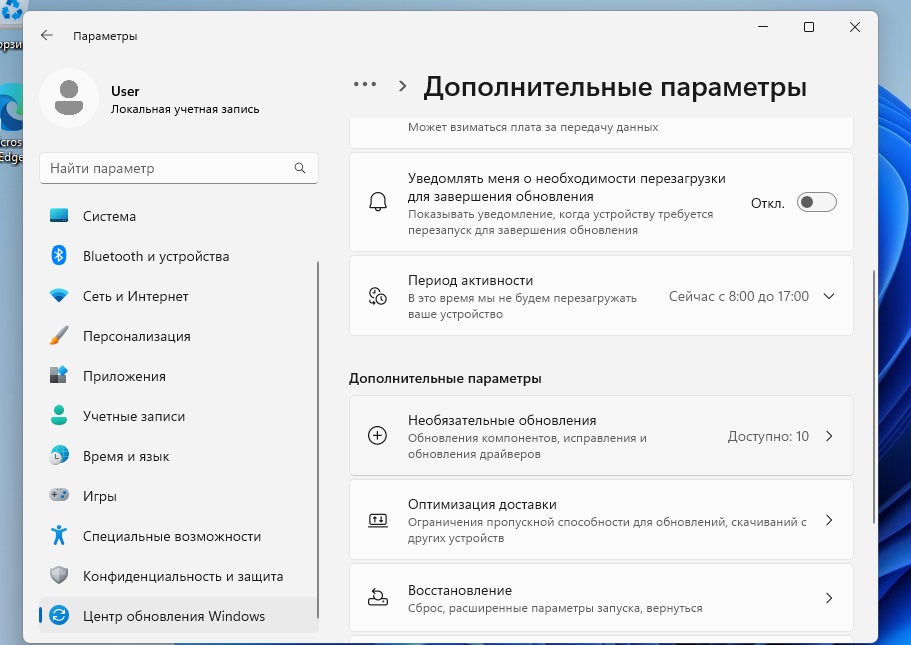
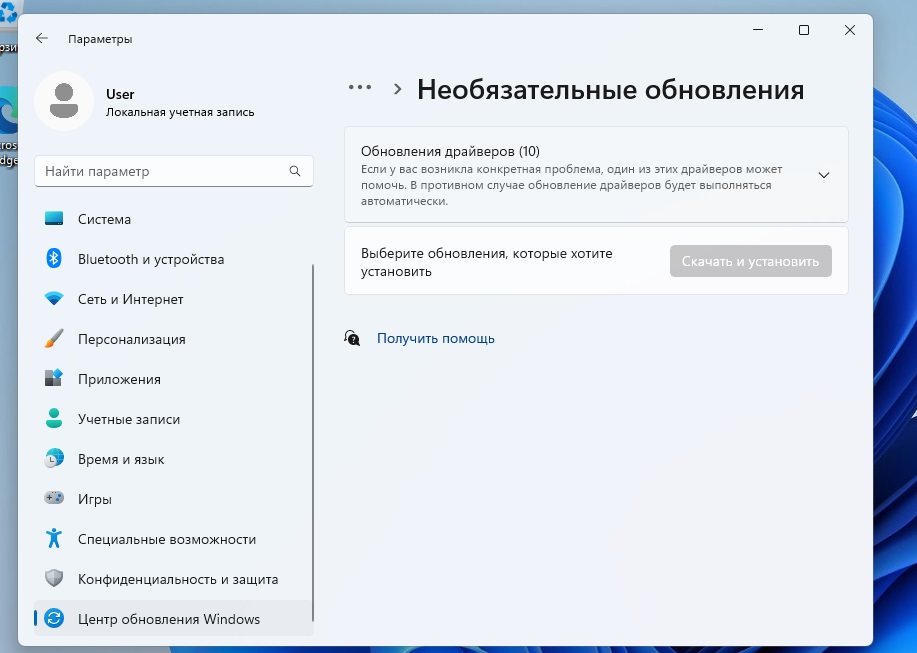
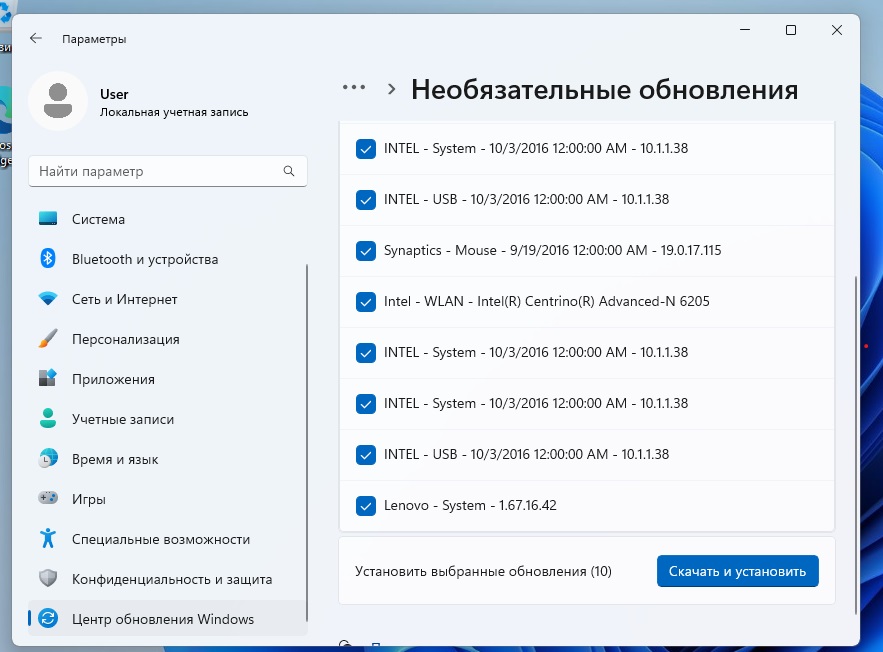
3. After installation, several devices will not be found in Windows (Fig. 03). First of all, install 8axw02ww.exe for the card reader, then, without rebooting, install 83ra31ww.exe (this is Intel AMT). During the installation process, Windows itself will offer to download and install Net Framework 3.5, you must agree and do this. After installation and reboot, only ACPI will remain unfound; for it, you need to enable the “Search for updates for other Microsoft products” switch in the update settings (Fig. 04), then start searching for updates, then wait until the system installs everything and reboot with the update. After the reboot, you need to go back to the update settings, then to optional updates (Fig. 05), (Fig. 06) and select all the drivers that the system offered (Fig. 07). After this, you need to replace the Fingerprint driver with the one we downloaded earlier from the Microsoft catalog. After this, you need to reboot the laptop with the update for the new drivers to work fully.
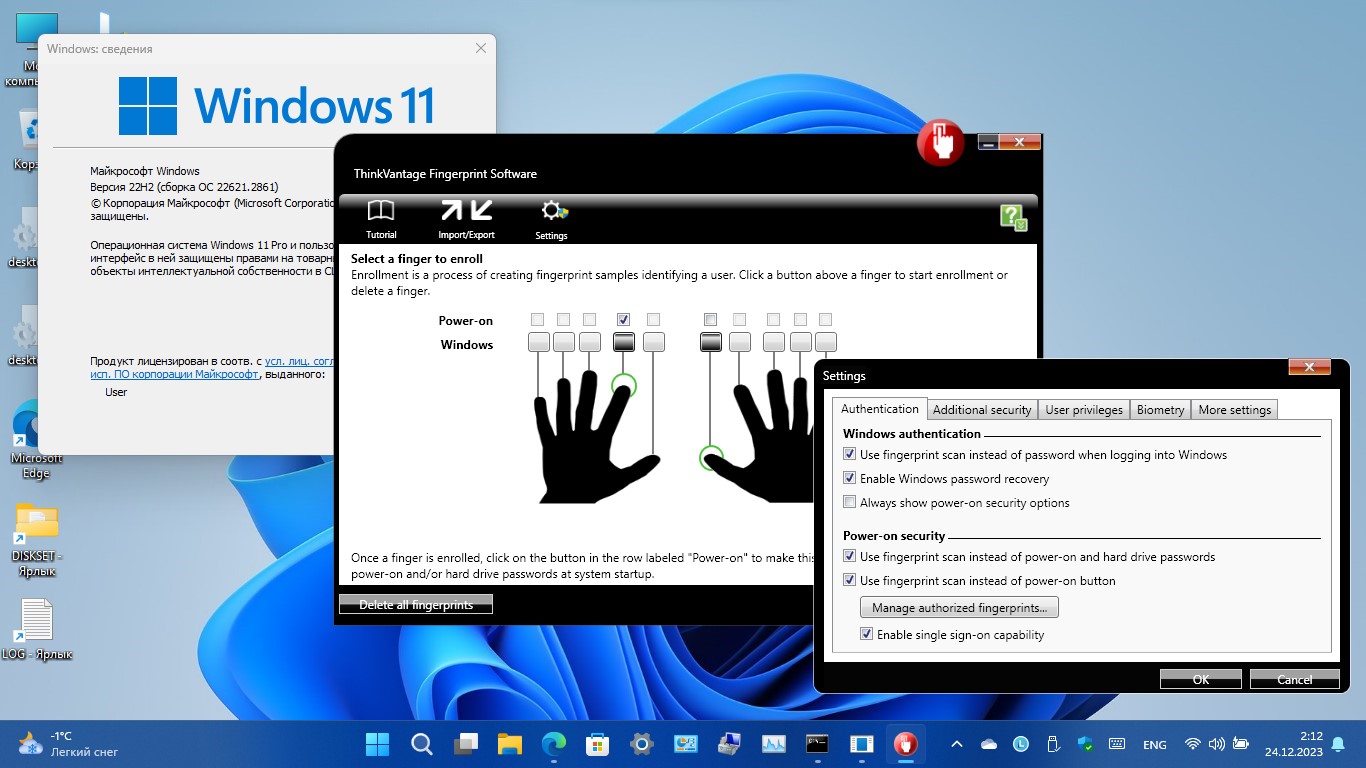
4. Run gpedit.msc and in computer configuration/Administrative Templates/Windows Components/Biometrics enable all policies (except for face, since our camera is old).
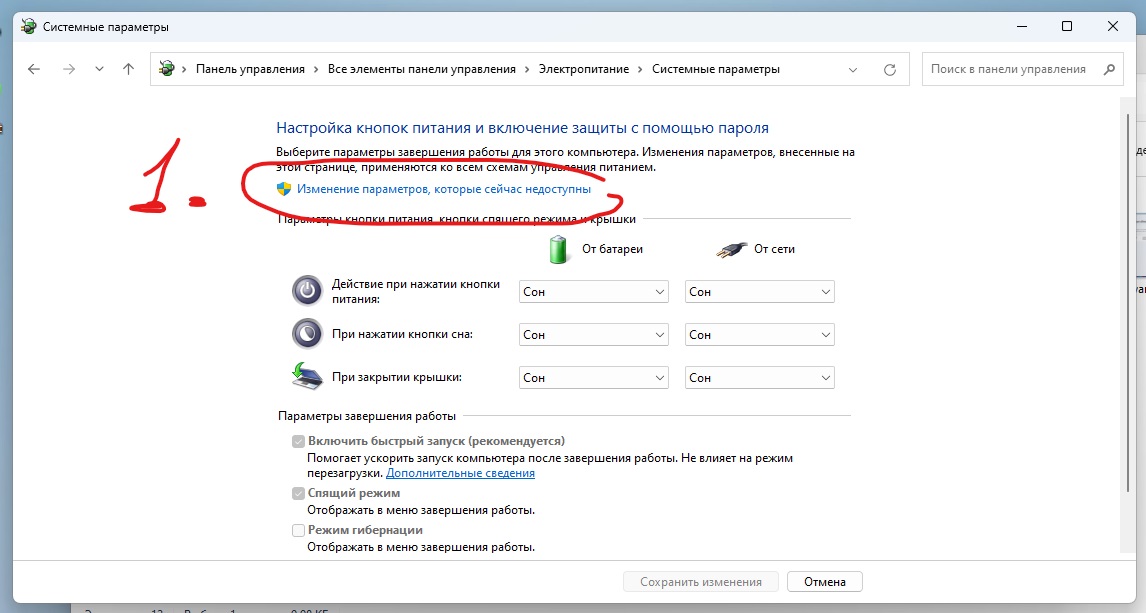
5. In the power settings, set for pressing the power button - shutdown and for closing the lid - shutdown. This is necessary because In sleep mode you will have to scan your finger twice.
Installing utilites
6. Install Fingerprint Software, reboot, set a password for your account and set up one finger (I set up the thumb of my right hand). Turn off the laptop, the green Fingerprint indicator should be on. We turn on the laptop with the button (by pressing it for a couple of seconds and causing a normal shutdown), when logging in, we move the configured finger over the sensor to log into Windows. We agree to use biometrics in the window that appears. Next, we set up the second finger (I set up the index finger of the left hand) and put a checkmark on it to turn on the power and log into Windows, and from the thumb of the right hand we uncheck the power on. If the second fingerprint does not scan, simply reboot the laptop again. Save and turn off the laptop by pressing the power button for a couple of seconds. Now, to turn on the laptop and log in, you only need to scan your left index finger once. Only in this mode (two fingers, one with enable) does autologin work in Windows 11. Now you can uncheck the Enable at startup checkbox from the Fingerprint settings window.
I got to this point because I'm from Russia, and I usually scan two fingers, one main, one spare, in case a bear on the street grabs one of my fingers. But it’s better to scan three fingers, because... another one might get stuck in a vodka bottle (joke).
At this point, the main stage of system installation + encryption + driver setup + biometric sensor can be considered complete.
Installing and configuring Hotkey
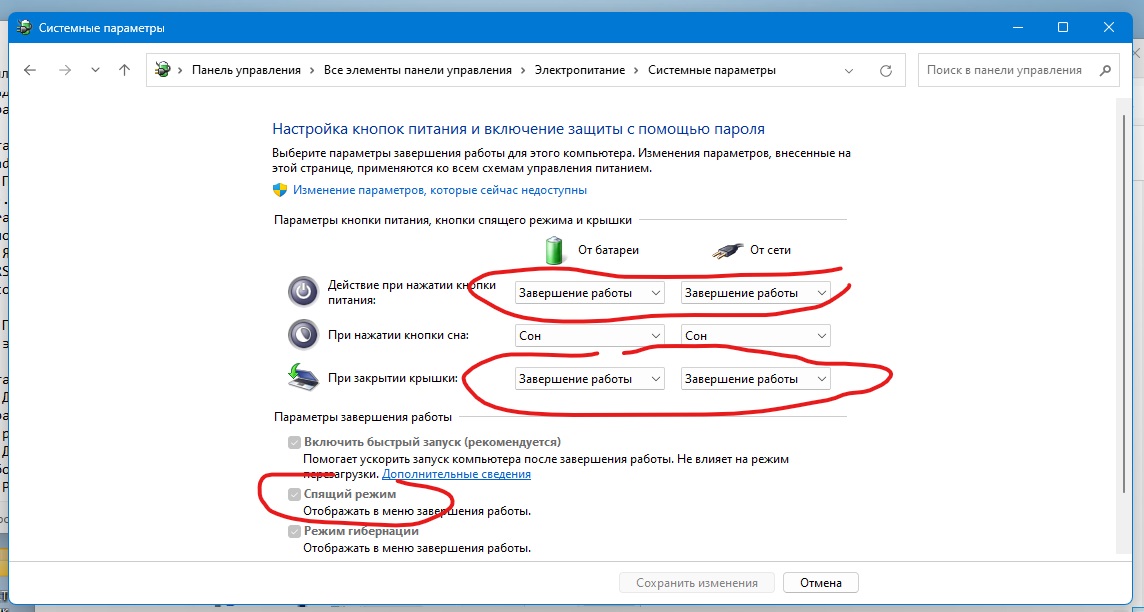
7. Before installing Hotkey, you must enable hibernation mode on your laptop. To do this, in Control Panel/Power Options/Action of the power buttons, check the appropriate box. I install it on laptops as shown in (Fig. 08), (Fig. 09).
8. To install Hotkey, you must first install the PM (Power Manager) driver (n19ku12w.exe) (PM version 1.67), this is necessary for the correct operation of the {Fn}+{F12} combination, which sends the laptop into hibernation. After this, reboot your laptop.
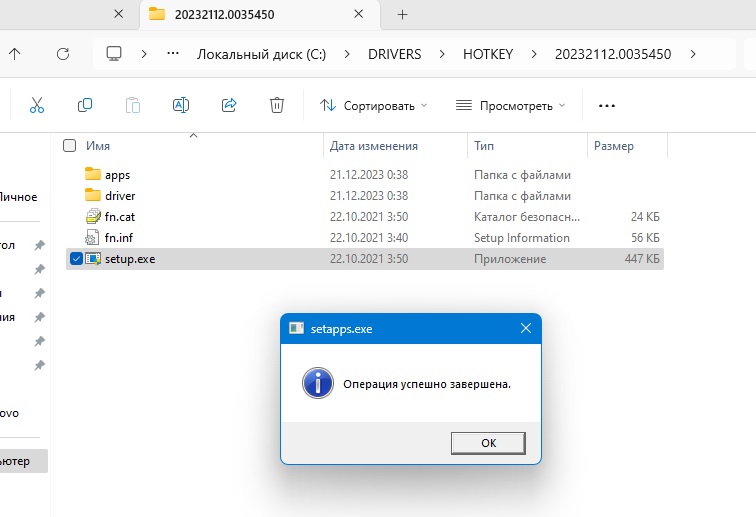
9. Unpack and install the new hotkey r0yvu37w.exe (Fig. 10). Reboot your laptop.
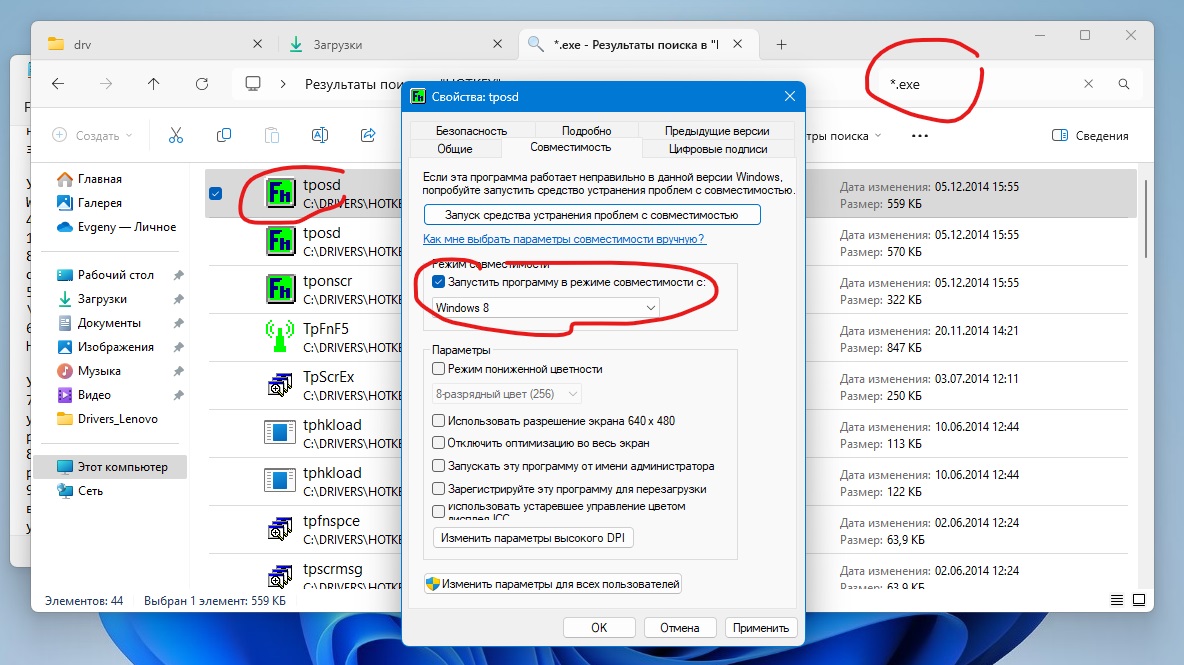
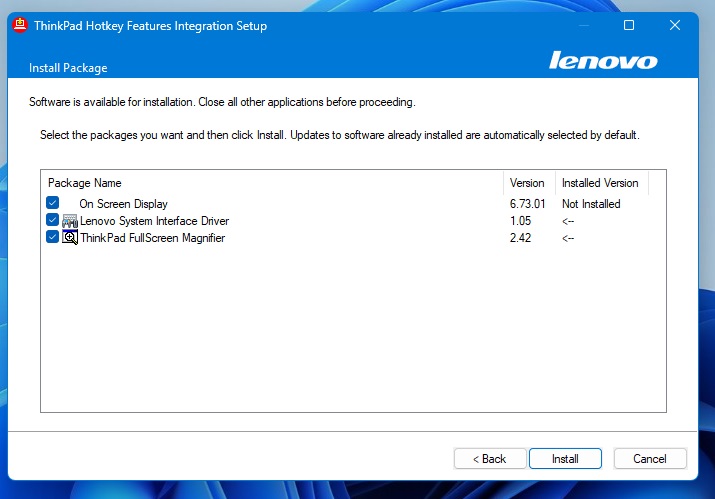
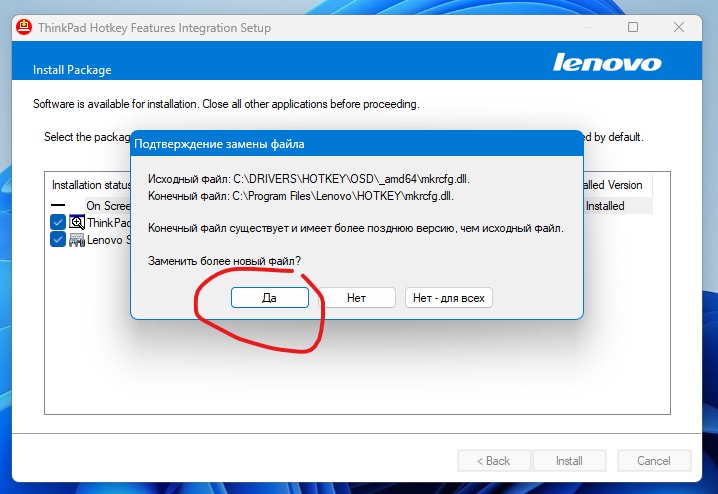
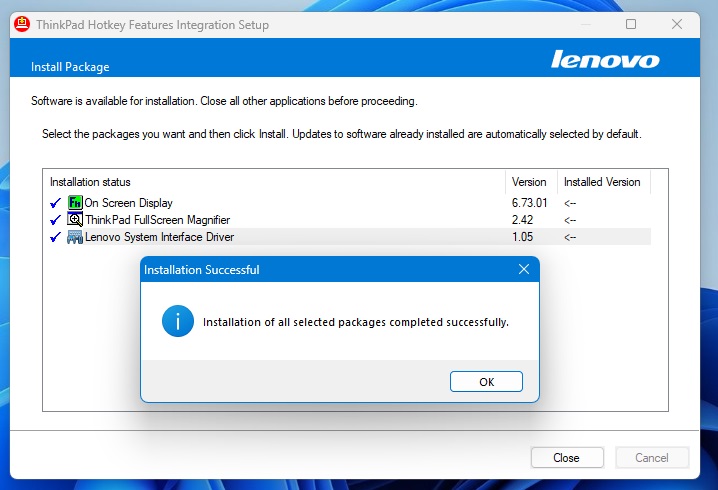
10. Unpack the old hotkey (8jvu43ww.exe), do not install! Go to the C:\DRIVERS\HOTKEY directory, find all the *.exe files and set the compatibility mode for them (Fig. 11), the mode that Windows itself will offer (where is Windows 8 and where is Windows Vista). Only after this run Setup (Fig. 12). If this is not done, the programs will not install normally. During the installation process, replace new files with older ones (Fig. 13). As a result, everything should be installed as shown in (Fig. 14). After this, reboot your laptop.
11. After the reboot, all key combinations should work (except for those on the touch screen, we’ll deal with them later), except:
- {Fn}+{F3}
- {Fn}+{F6}
- {Fn}+{F8}
- {ThinkVantageButton}
They will need to be configured manually.
12. {Fn}+{F6}. Unpack the installer of communication utilities (new g1cu28ww.exe or old cu12ww.exe, to choose from) Run the installer from C:\DRIVERS\WIN\COMMUTIL. Reboot the laptop. After installing this program, when you press {Fn}+{F6}, the "Lenovo Setting" window will appear with the error "This key combination opens the Lenovo Setting program. You do ...". To remove this message, you need to rename the C:\Program Files\Lenovo\HOTKEY\tpfnf6.exe directory to tpfnf6.exe-. Anyway, the interception of the keyboard code goes into a call to the Communication Utility function and then the press is also processed by tpfnf6.exe, which wants to call Lenovo Setting, which, in turn, is not currently supported by Lenovo.
13. {Fn}+{F3}. This combination in Windows 7 called up Lenovo Power Management, which is not available on Windows 11. Alternatively, you can use the new Lenovo Vantage, obtained from the Microsoft Store, or call up the Power Options Control Panel applet. I personally tried both options; the one that calls up the control panel settings is faster and more functional, because... Lenovo Vantage takes a long time to call.
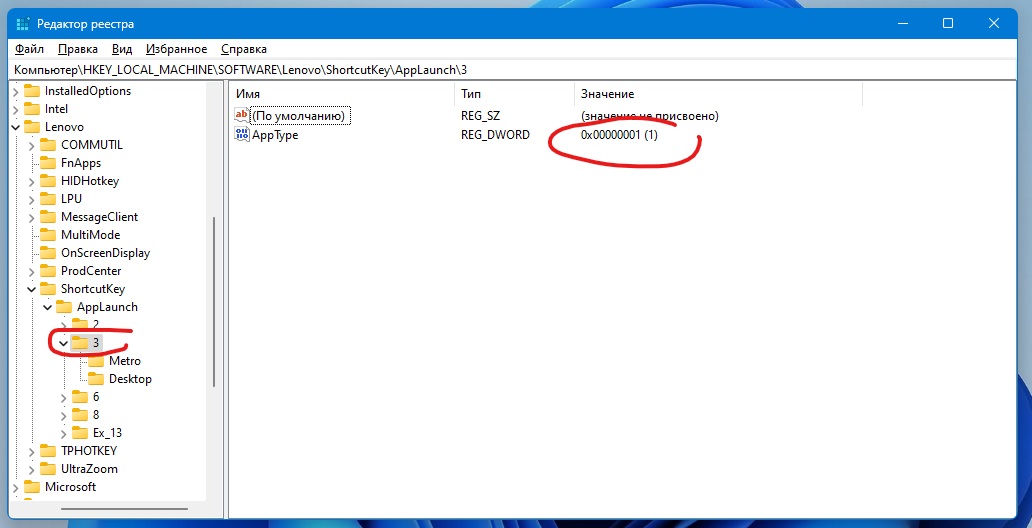
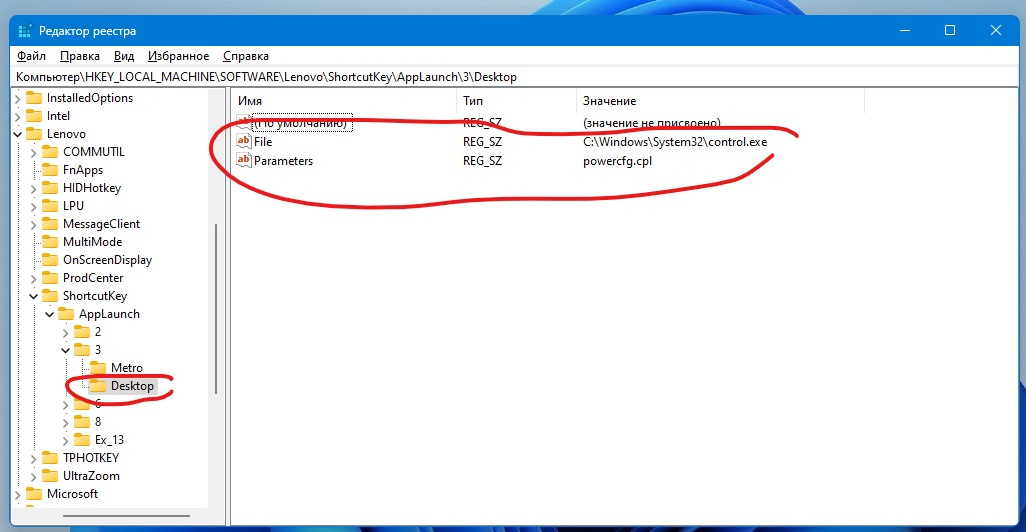
To configure the Control Panel applet, launch Registry Editor and navigate to HKEY_LOCAL_MACHINE\SOFTWARE\Lenovo\ShortcutKey\AppLaunch\3. In this section, set the value of the AppType key to 1 (Fig. 15). Inside the section, create a subsection Desktop, and in it two string parameters File and Parameters. Set the value of the File key to C:\Windows\System32\control.exe and set the value of the Parameters key to powercfg.cpl (Fig. 16).
------------
Remark: The ShortcutKey\AppLaunch keys were created by a new hotkey (Windows 10), they work like this: function keys are designated by numbers, inside the section of the corresponding key there is a switch which application to use - the standard one (executable file with parameters) or the new UMP or, otherwise "Metro" ", these are apps from the Microsoft Store. The values there are: 1 - launch standard, 2 - launch UMP and open a page in the application there at the URI address. Thus, by setting AppType=1, we tell the system “run a standard application” and it takes its name from the “Desktop” section of the “File” key, and the parameters, respectively, from the “Parameters” key. In this case, run the standard application C:\Windows\System32\control.exe (Control Panel) and display powercfg.cpl (Power Options control panel item) there.
The procedure for intercepting keyboard codes is as follows:
a) first the branch HKEY_LOCAL_MACHINE\SOFTWARE\IBM\TPHOTKEY\*** is processed, for example, starting the utility {Fn}+{F6} is specified in HKEY_LOCAL_MACHINE\SOFTWARE\IBM\TPHOTKEY\CLASS\01\06
b) then the branch HKEY_LOCAL_MACHINE\SOFTWARE\Lenovo\ShortcutKey is processed, for example {Fn}+{F2} is specified in HKEY_LOCAL_MACHINE\SOFTWARE\Lenovo\ShortcutKey\AppLaunch\2\Desktop
------------
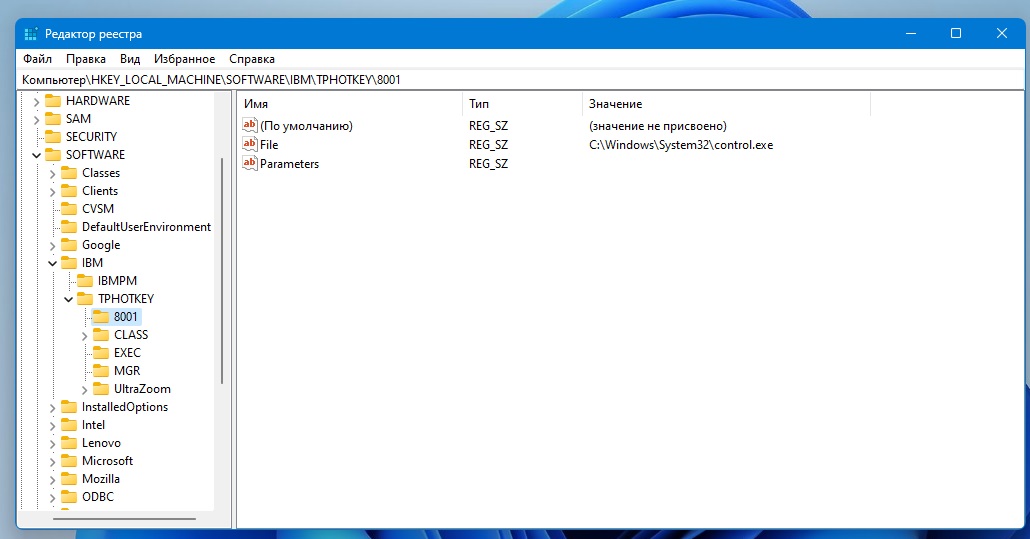
14. {ThinkVantageButton} Previously, in Windows 7, the button worked in two ways - a) when the laptop was turned on, it went to a hidden partition on the disk, from which Windows 7 was reinstalled and b) when Windows 7 was running, the SimpleTap utility was called, in earlier Windows other utilities were called . The button traces its origins back to the IBM Access button; at one time it was “Wow”. Now the marketers have ruined everything, Windows 11 has its own semi-automatic recovery tools and I simply assigned this button to launch the control panel (and someone launches the calculator C:\Windows\System32\Calc.exe). You can configure something of your own))) It is configured in the same way as step 12, but first you need to create a section HKEY_LOCAL_MACHINE\SOFTWARE\IBM\TPHOTKEY\8001 inside which create two string parameters, which you probably already guessed about - File and Parameters . Leave Parameters empty and set File to C:\Windows\System32\control.exe (Fig. 17). After this, you need to restart the laptop for the machine to pick up the changes.
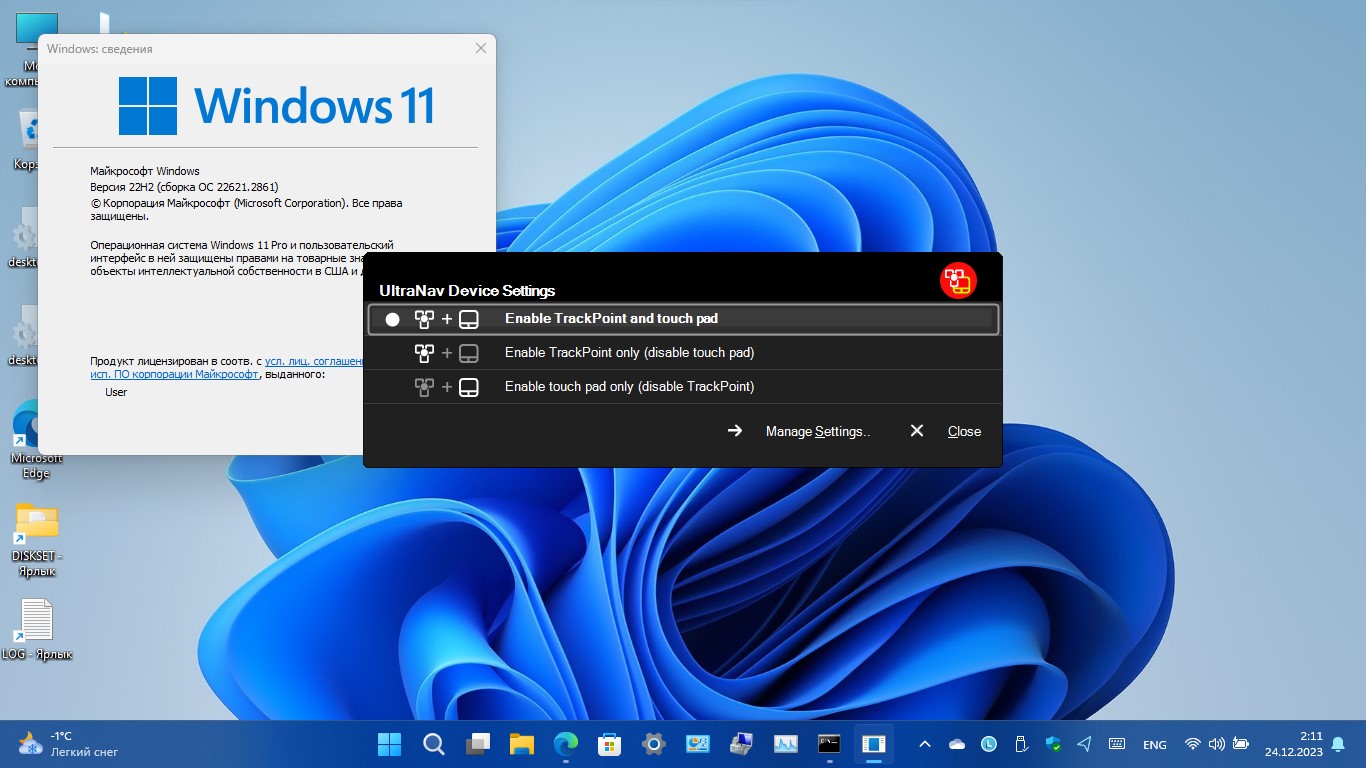
14. {Fn}+{F8}. At the moment, the utility opens a standard mouse settings window, but you can set a quick touchpad-joystick switch. To do this you need:
a) update the driver, replace driver version 19.0.17.115 installed via Windows update with version 19.0.17.142 (gggr07ww.exe), then reboot the laptop, and
b) install the OSD menu from 7vgq14ww.exe The installer of this utility does not run directly from Windows 11, giving the error “The administrator has blocked this application.” The probable reason is that the certificate that signed the application C:\DRIVERS\WIN\UNAVUTIL\setup.exe was included in the revocation list due to the blocking of the Verisign top-level certificate. To run the installer, you must first run CMD as an administrator, and in the CMD window specify the path C:\DRIVERS\WIN\UNAVUTIL\setup.exe. After installation, you will need to restart your laptop.
For the paranoid, yes, revoking all top-level certificates for Windows 11 could theoretically disable the system worldwide. Yes, this can be bypassed, but at first nothing will work.
At this stage, all the {Fn}+{F...} keys work. All that remains is to install the keys and utilities of the touch display and Lenovo Vantage so that the usual battery icon appears on the taskbar and the utility for scanning your finger (if there is physically a sensor and you want to protect yourself). My laptop, for example, has an encryption disk and turns on by scanning a finger, after which it automatically logs into the system - convenient and safe)))
Touch screen control keys
15. To install the driver, run the file 7wgl16ww.exe, after installation, restart the laptop.
16. To install a utility that will rotate an image to a specified position in tablet mode, unpack 7wg737ww.exe, then set the Setup.exe file to Windows Vista compatibility mode and run it. During the installation process, confirm the change with the button. After installation, restart the laptop and then in the menu C:\ProgramData\Microsoft\Windows\Start Menu\Programs\ThinkVantage set the shortcut to compatibility mode with Windows 7. There is still a problem here - for some reason from the standard Windows Start menu it still does not start, only with a shortcut.
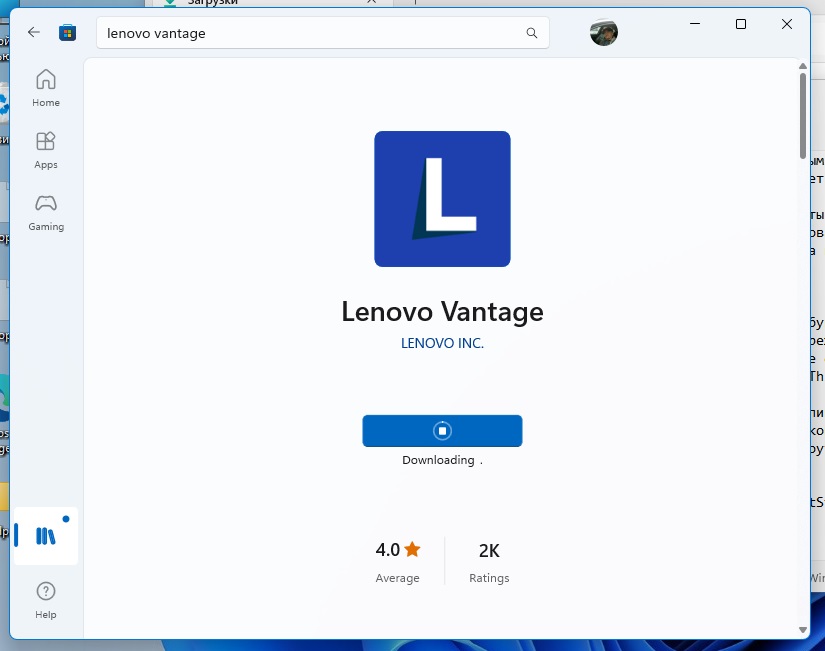
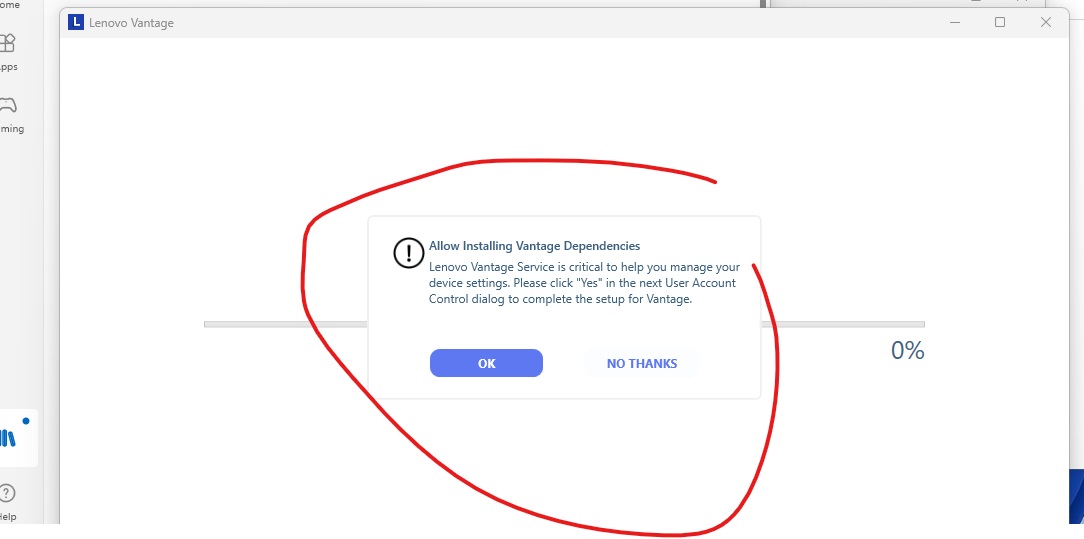
17. Lenovo Vantage. To return the battery symbol (works only in Windows 10) to the taskbar, install the Lenovo Vantage application from MicrosoftStore and agree to download the additional component (Fig. 18), (Fig. 19), (Fig. 20).
18. For hardware tests, you can install the Lenovo diagnostic program ldiag_5.11.0_windows_x64.exe.
19. Launch a CMD window as an administrator and enter the sfc /scannow command there, this will remove Windows errors. Then reboot, create a restore point and reboot again.
Results:
Fn5.jpg
Fn6.jpg
Fn8.jpg
Fingerprint.jpg
ShorcutandTPM.jpg
That's it, you now have a correct, normal laptop, almost the same in functionality as when it left the factory. Hooray! Now you can install programs as desired and transfer the necessary data. If you wish, you can also set the administrator password in the bios (this is for the paranoid))) Here in the text there should be details for donations, but to be honest, don’t bother with them, use it for free, just say thank you)
