Page 1 of 1
Changing the keyboard only on an X1C gen 1
Posted: Mon Apr 17, 2017 1:15 pm
by ECourts
The keyboard on my Gen 1 X1 Carbon (Model 3444-CT0) has failed (´"9", "O", "L" and "." no longer work

) so I'd like to change it for a new one. The complete assembly with bezel, including touchpad and fingerprint reader is easy to buy and swap, but expensive as I only need the keyboard in the middle. I've found a source for a new keyboard alone (FRU 04Y0798) but can't figure out how to separate it from the bezel to swap over. There are no obvious screws or retainers and the old keyboard seems solidly fixed to the bezel, even when I deform it.
Does anyone have any tips to remove and replace the keyboard module only (or better still get my missing letters back on the old one)?
Thanks!
Re: Changing the keyboard only on an X1C gen 1
Posted: Mon Apr 17, 2017 3:27 pm
by RealBlackStuff
Did you replace the original SSD with a non-original, slightly thicker variant?
Re: Changing the keyboard only on an X1C gen 1
Posted: Tue Apr 18, 2017 3:14 am
by ECourts
No. In every respect the system is original.
I can remove the front bezel, including keyboard, trackpad and fingerprint reader by releasing the 7 screws on the rear and unplugging the ribbon connector from the mainboard. I want to detach the keyboard only from the rest of the assembly to replace it (I can buy a new keyboard for about 40€, the complete assembly costs around 250€, so there is quite a difference). I simply can't see how the keyboard attaches to the assembly - there are no obvious mounting screws, clamps, slides or locators - and I don't to be too brutal and break something meaning I can't re-attach a new one.
Re: Changing the keyboard only on an X1C gen 1
Posted: Tue Apr 18, 2017 6:08 am
by exTPfan
The keyboard/bezel is one piece with a rectangular hole for the touchpad. You should be able to push the touchpad out.
Re: Changing the keyboard only on an X1C gen 1
Posted: Tue Apr 18, 2017 6:42 am
by ECourts
Maybe I am not explaining this very well. The bezel assembly (with keyboard and other peripherals) looks like this:
https://media.cnetcontentsyndication.co ... view-4.jpg
But the keyboard alone (the bit I want to swap out) looks like this:
https://ae01.alicdn.com/kf/HTB12e3hKpXX ... inkpad.jpg
I simply want to be able to split the keyboard from the bezel to be able to replace it, and I can't see how it is fixed (or can be re-fixed). I can see it is a separate component and not integral to the bezel, but there has to be some clever trick to split it off.
Thanks!
Re: Changing the keyboard only on an X1C gen 1
Posted: Tue Apr 18, 2017 7:02 am
by RealBlackStuff
Before you posted the pictures, I had to open up my own X1C1 to have a look.
Apparently the KB is glued in all around the KB-edges.
Use a guitar plectrum or similar to carefully slip between KB-edge and KB-deck(?) and work your way all around the KB.
Be extra careful when you get near the top with the blue PCB that has some flat cable connectors.
The KB should pop out after that.
Then check for some doublesided tape to get the new KB in.
Good luck and let us know please.
BTW, if you can take some pictures when you have the KB out, so we can see the under-side of the KB-deck.
Re: Changing the keyboard only on an X1C gen 1
Posted: Tue Apr 18, 2017 7:24 am
by ECourts
Thanks a lot and for your research...
I'm really surprised this is not documented anywhere. There are plenty of places offering the keyboard alone for sale and while I can find instructions, guides and videos for fitting practically every other component on the X1C, I've not found anywhere that explains removing the keyboard element...
I'll order the keyboard shortly and will report back on progress.....
Re: Changing the keyboard only on an X1C gen 1
Posted: Mon May 15, 2017 9:58 am
by ECourts
So, I'm now able to report back on my success in changing the keyboard..
I bought an original Lenovo keyboard brand new via Ebay. I spoke to the dealer before I made the purchase and he pretty much confirmed that the old keyboard had to be broken out and the new one glued in place as suspected in earlier posts. However, that wasn't the case. The keyboard was delivered in four pieces - the mechanical keyboard itself and 3 plastic underlays - a black keyboard mask, a clear plastic sheet with little dots on and a white plastic backing. Each of these had a removable protection sheet which made it self-adhesive. so it was clear the intention was to build up the the layers into a complete keyboard by sticking them together.
Having disconnected all interface cables I proceeded to remove the same same layers from the old keyboard starting with the white outer cover (having first removed the red rubber cap on the pointing stick, as this was integrated into the back of the white cover), simply lifting them from one corner and peeling them off. In doing so the layers were damaged but this was of less concern as they were being replaced, When I removed the third plastic layer, only the old keyboard mechanics were left and it was clear this was held in place by a large number really small screws distributed throughout the keyboard - about 40 in total. I removed all these screws and lo and behold the keyboard could simply be lifted from the bezel assembly. I dropped in the new one and laboriously replaced all 40 screws (a magnetic screwdriver came in handy here to pick up each screw and locate it). Removing the backing paper so they became self-adhesive I aligned and added the new inner plastic layers in the correct order, finishing with the white cover. The pointing stick module was already attached to the white cover but needed another 2 screws to attach it firmly to the assembly. Having re-attached the different interface cables I could now re-secure the bezel assembly to the main case with the 7 screws on the back and replace the rubber cap on the pointing stick.
I fired up the laptop and everything works perfectly, including keyboard lighting.
All I need to do now is replace the battery and it will be as good as new. A replacement battery is on it's way from China - I didn't want to order this until I was sure I could get the keyboard back and working.
Thanks for the help.
Re: Changing the keyboard only on an X1C gen 1
Posted: Thu May 18, 2017 1:49 am
by w0qj
Thank you for your update for our collective information;
much appreciated!
Re: Changing the keyboard only on an X1C gen 1
Posted: Sun May 21, 2017 3:56 pm
by Tasurinchi
Thanks for the wrap up!

I also just got an X1C Gen 1 with a defective KB so I would need to repeat your steps, did you do some pictures by chance?
Re: Changing the keyboard only on an X1C gen 1
Posted: Mon May 22, 2017 11:05 am
by ECourts
I'm afraid not, but it was very straightforward. Happy to lead you through it by private message, email or WhatsApp if it's any help.
I was pretty scared when I started out, but my fears were unfounded. My X1C now also has a new battery and is as good as new...
Re: Changing the keyboard only on an X1C gen 1
Posted: Mon May 22, 2017 3:39 pm
by Tasurinchi
Thanks! Once I have the KB I may contact you if I'm stuck!
Re: Changing the keyboard only on an X1C gen 1
Posted: Tue May 23, 2017 2:49 am
by ECourts
Just make sure you have the right replacement keyboard for your model. When I was looking I found there were a lot of different models out there. I had to match the FRU number on the original keyboard (which you can only find be removing the complete bezel - it's on the white underside of the keyboard itself). I paid 39€ for mine plus shipping.
Re: Changing the keyboard only on an X1C gen 1
Posted: Sat May 27, 2017 7:38 am
by Tasurinchi
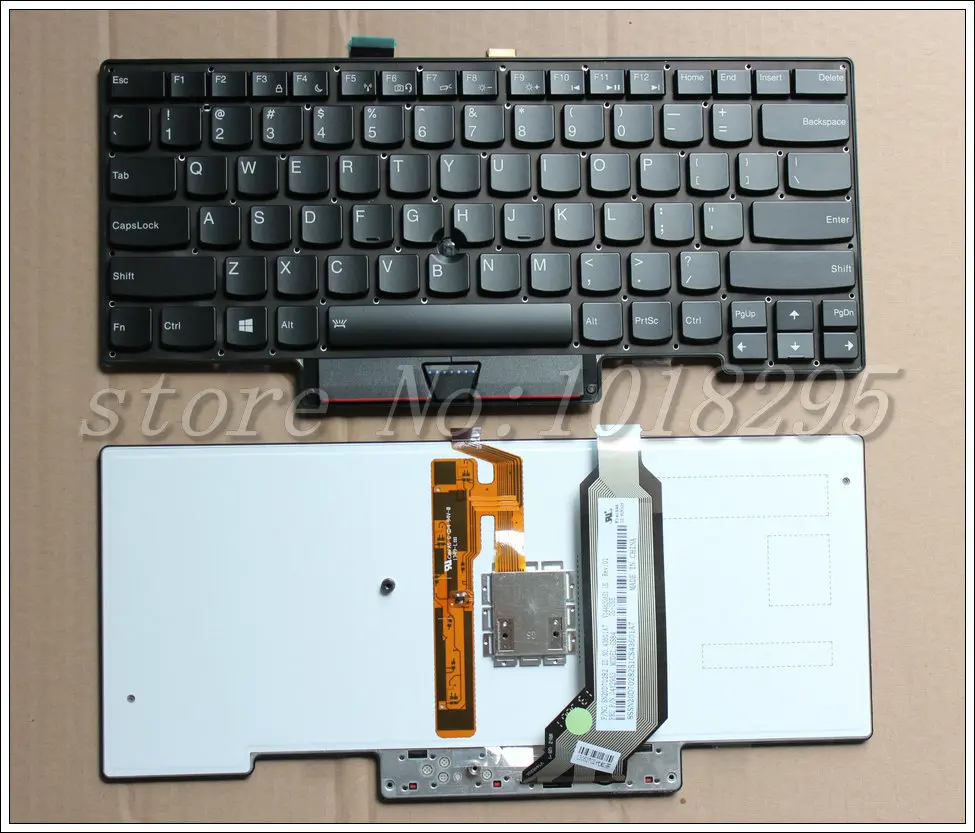
I replaced my KB today. It's not so difficult as it may sound, the white layer is quite sturdy and can be removed easily with a guitar pick. Patience is needed to screw all tiny screws back in place, but apart from that nothing special.
I took some pictures of the replacement keyboard, for the curious ones
 click here!
Re: Changing the keyboard only on an X1C gen 1
Posted: Sat May 27, 2017 7:51 am
by ECourts
I found that there were more holes than screws. I didn't note the location of every screw I removed, but just redistributed then evenly when I put them back.
Good that you were able to do it, and hope my comments helped. I'm quite astounded that we seem to be the first to have tackled this, or at least, to publicise it. So much cheaper than buying the new bezel assembly, and, I have to say, having installed a new battery at the same time my 5-year old laptop is like new!
Re: Changing the keyboard only on an X1C gen 1
Posted: Sat May 27, 2017 8:18 am
by Tasurinchi
Yes, I also did the same with the screws, I first thought somebody had previously try to swap the KB and lost some screws

ECourts wrote:
Good that you were able to do it, and hope my comments helped
Sure they helped, specially to make me aware of this procedure before ordering the replacement, I was assuming a KB swap in the X1C would be like any other ThinkPad

Now I'm waiting for my AUO Panel to do the FHD Mod
