


Hi, I recently bought an X201 with no backlight on the screen. I bought a replacement LCD for it and fit it today, unfortunately with the same results - the Thinkpad logo shows up slightly on the screen, but the screen is not illuminated. Everything works as usual using an external monitor.
Since this PC uses LED-backlit screens, there are no inverter board (as far as I know of).
What do I start checking, what could cause this problem? I know for sure that the original screen is functional and is not cracked. The new one is also fully functional.
EDIT:
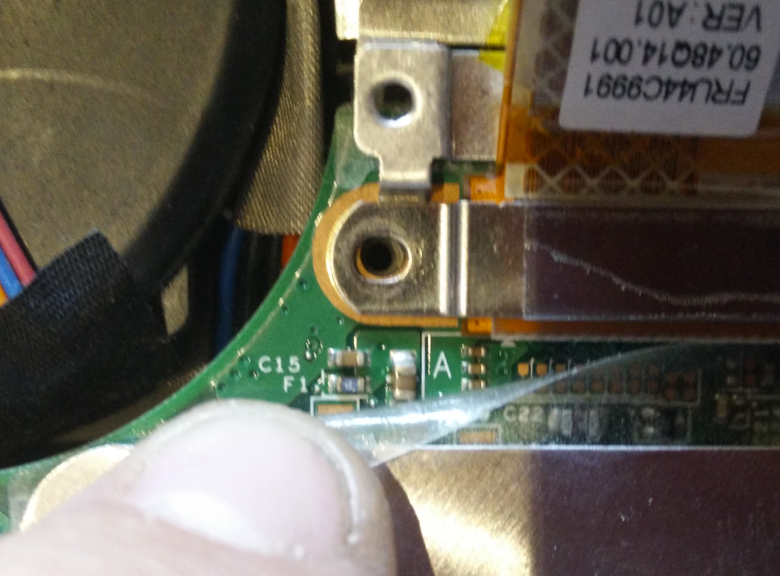
Read something about a blown fuse, found the one labeled F1 on the motherboard, right next to the lcd connector but I am unable to identify the fuse as blown or not.
picture here: https://i.gyazo.com/a70f9f36dc867c40842 ... 68c747.png
Read about it here: http://forum.thinkpads.com/viewtopic.php?t=106172
Take a look at our
ThinkPads.com HOME PAGE
For those who might want to contribute to the blog, start here: Editors Alley Topic
Then contact Bill with a Private Message
ThinkPads.com HOME PAGE
For those who might want to contribute to the blog, start here: Editors Alley Topic
Then contact Bill with a Private Message
X201 no backlight
-
RealBlackStuff
- Admin Emeritus

- Posts: 24724
- Joined: Mon Sep 18, 2006 5:17 am
- Location: Loch Garman, Éire
Re: X201 no backlight
Use a (digital) multimeter such as this one:

Set the rotating switch to CONTINUITY (in the above picture it's the Diode/Buzzer symbol ->|- •))) position, under the word SELECT, and press the SELECT switch to turn the buzzer on/off).
Touch the test probes together, to check that the meter buzzes.
Now touch the probes to both sides of the fuse. If the fuse is OK, you will hear the buzzer.
If the fuse is blown, you hear silence
Repair it by piggy-back soldering a new fuse on top of the old one.
Fast-acting FUSE, 3A, 32V
Lovely day for a Guinness! (The Real Black Stuff)
But I actually prefer Murphy's from Cork!
But I actually prefer Murphy's from Cork!
Re: X201 no backlight
Cheers, just the info I needed! I'll give it a go in the weekend.
Re: X201 no backlight
Finally got around to have a look at this. Is there a certain approach to apply when soldering the new fuse on top of the old one? When I finally manage to get my soldering iron into just the right spot, I cannot seem to get any type of solder to stick, and the fuse is so small that they are nearly impossible to align properly. Any tips are greatily appreciated.
-
axur-delmeria
- Senior ThinkPadder

- Posts: 4413
- Joined: Mon May 28, 2012 5:49 am
- Location: Metro Manila, Philippines
Re: X201 no backlight
While I haven't tried soldering microfuses yet, I've read a simple advice in an electronics forum elsewhere: use a small dab of superglue to fix the fuse in place so that it won't move when you're soldering.
Of course, you should superglue the body of the fuse and not the metal terminals.
Of course, you should superglue the body of the fuse and not the metal terminals.
Planned Purchase: T480s i5-8350 FHD Touch
Impulse Buy: Thinkpad not named for safety reasons
RIP: X220 4291-C91 X61 7676-A24 760XD-U9E
Impulse Buy: Thinkpad not named for safety reasons
RIP: X220 4291-C91 X61 7676-A24 760XD-U9E
-
RealBlackStuff
- Admin Emeritus
- Posts: 24724
- Joined: Mon Sep 18, 2006 5:17 am
- Location: Loch Garman, Éire
Re: X201 no backlight
Superglue the fuse to the end of a matchstick.
Then put the fuse in place (piggyback on top of the old one) and tape the rest of that match to the motherboard (works 8 out of 10 times).
Easy to then solder the fuse and break off the match.
Then put the fuse in place (piggyback on top of the old one) and tape the rest of that match to the motherboard (works 8 out of 10 times).
Easy to then solder the fuse and break off the match.
-
rkawakami
- Admin Emeritus

- Posts: 10327
- Joined: Sun Jun 04, 2006 1:26 am
- Location: San Jose, CA 95120 USA
- Contact:
Re: X201 no backlight
Some comments for future use...
I would recommend using the OHMS (resistance) range on the multimeter instead of the Buzzer or Diode check. The reason being is that the voltage applied across the multimeter leads in the ohmmeter mode (~0.2V, for my similar Craftsman meter) is typically lower than what's provided with the diode check (~1.5V) or buzzer (~0.45V). No sense in applying more voltage than needed to see if the fuse is blown. Also, the buzzer or diode check could give a sound or reading for a resistance of several hundred ohms (depends on the meter), which means if the fuse is bad (infinite ohms) but the rest of the circuit provides a path of resistance, it's possible to falsely label a bad fuse "good". If the meter is in the resistance mode and measures 0 ohms, you KNOW that the fuse is good. Anything other than 0 ohms (or very nearly so) is a bad fuse.RealBlackStuff wrote:Set the rotating switch to CONTINUITY (in the above picture it's the Diode/Buzzer symbol ->|- •))) position, under the word SELECT, and press the SELECT switch to turn the buzzer on/off). Touch the test probes together, to check that the meter buzzes.
axur-delmeria wrote:While I haven't tried soldering microfuses yet, I've read a simple advice in an electronics forum elsewhere: use a small dab of superglue to fix the fuse in place so that it won't move when you're soldering.
What works for me is to tin the ends of the replacement fuse before attempting to mount it atop the bad fuse. This involves applying a tiny amount of solder onto each end of the fuse. Do this by melting a small amount of solder on the tip of the iron and then touching it to one end of the fuse, holding it down with some tweezers or small screwdriver. Obviously do this on a surface which can withstand the heat and/or you don't mind ruining. Repeat on the other end. Then put the fuse on top of the blown one (tinned side down), heat up one end with the soldering iron and repeat on the other end, again holding down the new fuse with tweezers or screwdriver. This method can be eliminated if you have a second set of hands to help with holding down the fuse while you solder it in place.RealBlackStuff wrote:Superglue the fuse to the end of a matchstick. Then put the fuse in place (piggyback on top of the old one) and tape the rest of that match to the motherboard (works 8 out of 10 times).
Ray Kawakami
X22 X24 X31 X41 X41T X60 X60s X61 X61s X200 X200s X300 X301 Z60m Z61t Z61p 560 560Z 600 600E 600X T21 T22 T23 T41 T60p T410 T420 T520 W500 W520 R50 A21p A22p A31 A31p
NOTE: All links to PC-Doctor software hosted by me are dead. Files removed 8/28/12 by manufacturer's demand.
X22 X24 X31 X41 X41T X60 X60s X61 X61s X200 X200s X300 X301 Z60m Z61t Z61p 560 560Z 600 600E 600X T21 T22 T23 T41 T60p T410 T420 T520 W500 W520 R50 A21p A22p A31 A31p
NOTE: All links to PC-Doctor software hosted by me are dead. Files removed 8/28/12 by manufacturer's demand.
-
RealBlackStuff
- Admin Emeritus
- Posts: 24724
- Joined: Mon Sep 18, 2006 5:17 am
- Location: Loch Garman, Éire
Re: X201 no backlight
I normally do it the same way as Ray describes, but for educational purposes I suggested using the match.
During my LED-mod days I have replaced possibly close to 100 fuses.
On my T60 test-machine I have soldered two wires to the fuse-location (F8 next to the video-cable connector).
The other ends have a tiny alligator clip each.
The fuse itself sits in the middle of 3-4 layers of white electrical tape, with both fuse-ends sticking out.
The alligator clips each 'bite' on one side of that fuse.
If I blow the fuse, I just unclip the alligator clamps, push the old fuse out, push a new fuse in, and reattach the clamps.
Takes only a few seconds.
Lovely day for a Guinness! (The Real Black Stuff)
But I actually prefer Murphy's from Cork!
But I actually prefer Murphy's from Cork!
Re: X201 no backlight
Hey cola i have another thread with same model and problem : http://forum.thinkpads.com/viewtopic.php?f=43&t=119577
Did you already manage to solder it?
Did you already manage to solder it?
-
- Similar Topics
- Replies
- Views
- Last post
-
- 0 Replies
- 3274 Views
-
Last post by Caspian26
Sat Jan 31, 2026 12:12 pm
-
-
X61s screen backlight doesn't work. Faulty mobo?
by huohuo » Tue Mar 03, 2026 6:35 pm » in Thinkpad X60/X61 Series incl. Tablets - 4 Replies
- 2532 Views
-
Last post by huohuo
Sat Apr 04, 2026 3:43 pm
-
-
-
SXGA+ led backlight broke, which path to take
by huohuo » Wed Apr 15, 2026 7:18 am » in Thinkpad X60/X61 Series incl. Tablets - 4 Replies
- 322 Views
-
Last post by huohuo
Wed Apr 15, 2026 3:27 pm
-
-
-
AC adapter/charger for X201 (3113-X06)
by Brainer » Tue Nov 11, 2025 2:32 pm » in ThinkPad X200/X201/X220 and X300/X301 Series - 28 Replies
- 24070 Views
-
Last post by Brainer
Thu Dec 11, 2025 7:15 pm
-
Who is online
Users browsing this forum: No registered users and 83 guests