This guide has been tailored to the T4* series, but can be applied to other laptops.
I am writing this guide to help those who would like to push their laptops to obtain the longest battery life possible. First, let's start with some basics.
For starters download the IBM Battery MaxiMiser tool as well as Notebook Hardware Control. The video drivers from IBM will also help.
Battery MaxiMiser is a great tool to start off with. When you run the wizard, you get the chance to select from presets or to set your own. Among the things you can change is the time before your display turns off, time before your hard drive stops spinning, and more. It is a very useful tool and is pretty self explanatory. The next step is to setup Notebook Hardware Control (NHC).
NHC goes a step further and allows you to dynamically switch between FSB multipliers according to how much of your CPU needs to be used. There are many many many adjustments that can be made using NHC, and I will talk more about them later.
Having the ATI drivers and control center helps because of a feature called Powerplay. Powerplay clocks down your GPU when it isn't being used all that much. Much like NHC's dynamic multiplier switching, Powerplay also dynamically switches between GPU speeds.
In terms of hardware, many things can affect your battery life. Having 2 memory sticks uses more power than just using one stick. Unless you need 2gb of ram, consolidate your memory. Instead of having two 512mb sticks, use one 1gb stick. Update your hardware. The newer Dothan Pentium M's use a little less power than the Banias ones. A newer hard drive is going to use less of your battery than an older one. As for a difference between 5400rpm and 7200rpm hard drives, the differences are usually very small (in the tenths of a watt). If you are pushing for the absolute maximum, do some research ahead of time. Most hard drive manufacturers make detailed specifications available.
Another thing that helps in the way of hardware is disabling things you are not using. Why power the infrared port or the modem if you never use them? It isn't going to make a HUGE difference, but every watt counts.
When it comes to LCDs, there are significant differences. The XGA LCDs are going to use the least amount of power. SXGAs or UXGAs will all use noticeably more of your battery. While on the topic of LCDs... turn that brightness down! The brightness setting of your LCD also has a significant impact on your battery life. Test it out right now. Look at the difference in projected battery life between full brightness and minimum brightness. You can change the brightness with the FN + Home or End keys. I personally never need anything above the minimum brightness.
Another little thing that will slowly suck away bits of power is leaving a CD or DVD in the drive. The drive will keep the disk spinning as long as it's in there.
Another enemy of maxing out your battery life is heat. Anytime your CPU's fan has to kick on to cool it down, it uses some of that precious battery power. Using NHC and dynamic speed switching will help this.
*****//////////*****
Lets dive into NHC. NHC has many many different options, so I am going to cover them as best as I can.
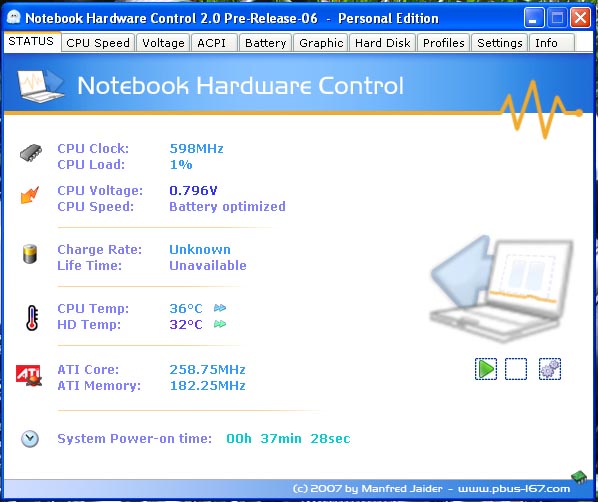
I will be going from left to right in the order of tabs. This was written with NHC version 2.0 (Pre-release 6). The status tab does what you think it does. It shows the stats of your system. It lists your cpu clock speed and voltage, cpu and hd temperatures, and the GPU clockspeeds.
By clicking the settings button on the left side (picture of the gears) you can modify the monitoring options. You can enable data logging, change what is monitored, etc.
The next tap, CPU speed, allows you to set the default speed setting for when you are running on the battery and AC. Choices include Max Performance, Dynamic Switching, Battery Optimized, and Max Battery. I personally have mine set to Dynamic Switching for battery and AC. Max Battery and Battery Optimized both set your CPU to the minimum speed checked in the Voltage tab. More on the Voltage tab in a minute. Dynamic Switching will change the multiplier based on the amount of performance needed. In this tab you can also change the dynamic switching rules. You can change these if you want, but the defaults used by NHC do just fine.
I am going to skip the Voltage tab for now, but, don't worry, I will come back to it later. The ACPI tab is next. ACPI allows NHC to monitor temperatures and control various hardware (LCD, WLAN, and CPU fan). If you want NHC to control this sort of hardware, you will need to do some extra work. Information can be found here and here.
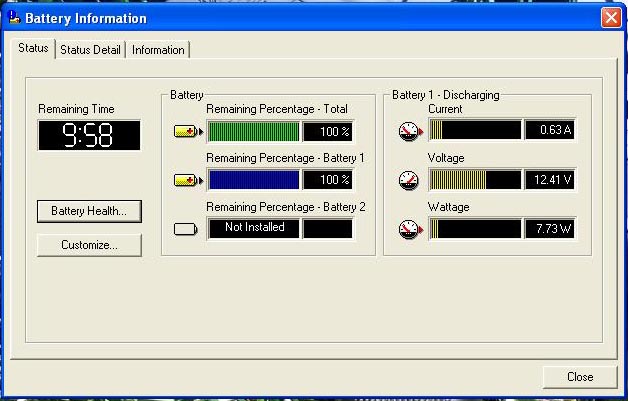
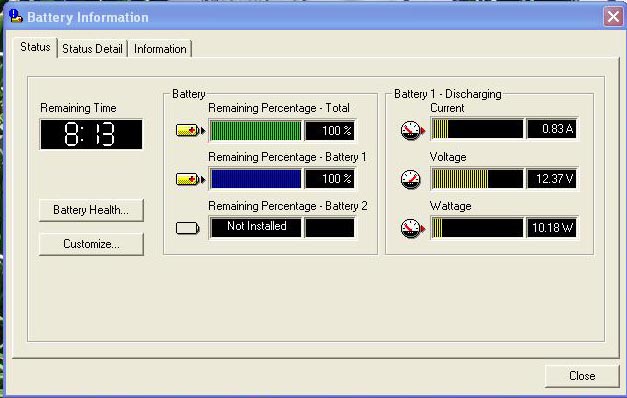
Now we have come to the battery tab. There is really not much here. You can select whether or not to have NHC display icons in your taskbar or system tray. Advanced battery settings includes more icon settings. From here you can disable the default windows battery icon. Battery MaxiMiser has it's own icon, and I like it a bit better than the windows one. To disable the windows battery icon, check "Hide the default system battery icon".
Under the Graphic option, you can enable control of the Powerplay feature of ATI's drivers for NHC. You are going to want to make sure Powerplay is active and that NHC is enabled to control it. The sliders control the settings for Powerplay. When you are on battery you probably want the slider slid all the way to the left, which is for maximum battery life. Sliding all the way to the right is for maximum performance.
Up next we have the hard drive tab. Here you can control the time before your computer goes on standby, if NHC can spin down the drive, and if you want NHC to monitor your hard drive. The settings here are pretty self explanatory.
In the profiles tab, you can set custom profiles that you can switch between. The default profiles do just fine, but don't let that stop you from playing around with them. Besides, it's only available in the paid version if I remember correctly.
The Settings tab doesn't have that much. Under Advances NHC settings, you can select which NHC related icons you want to be displayed.
There you go. There is Notebook Hardware Control in a nutshell. Now on to some of the really fun stuff.
*****//////////*****
!!!!!The following is ONLY recommended for ADVANCED users!!!!!
Now lets turn our attention to the Voltage tab. Here is where you can undervolt your CPU if you wish to do so. The awesome side effect to undervolting a CPU is less heat. This means your fan has to turn on less often, saving battery life.
Here is what I recommend in the way of procedures. While NHC does include a stability test, I personally recommend downloading a copy of Orthos. Orthos is widely accepted in the world of overclocking as the best tool to test the stability of a CPU.
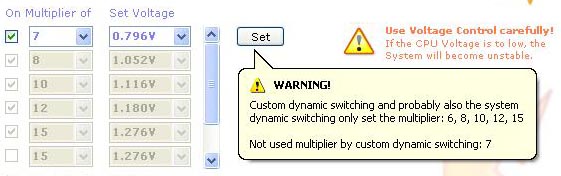
To use Dynamic Switching, you are locked down to the default multipliers set by NHC. What you can change, is the voltages. Here is what I do to find the minimum voltages for each multiplier. First, get out a pad of paper and a pen. Write down all of the default voltages for each multiplier. This is so that you can return it to the default settings if you ever want to. The next step is to check the box at the bottom to use only the first multiplier and voltage setting. Using this box, NHC will never set the CPU to be faster or slower than that fist setting. This is great for testing.
To find the minimum voltage for each multiplier decrease the voltage by .03 - .05 volts at a time. After each voltage change, you need to click "Set". NHC will do a quick stability test. If you BSOD during NHC's test, don't freak out. Reboot the laptop and you will find that NHC has automatically set the voltage back to the last stable one.
Once NHC has done it's quick test, we want to fire up Orthos and really give the CPU a test. In the overclocking world a CPU is considered "stable" if Orthos can run for 8 hours without error. For this though we only really need to test it for half an hour. If you really want to go all out you can test for 4 hours, but I don't honestly think you need to test for 8 hours. I would recommend testing for 4 hours if you have the time. It is a slow process, I know, but the benefits are worth it. When you do use Orthos, set the priority to 9.
Once you find a voltage at which running Orthos results in an error (or maybe a BSOD), go to the next available higher voltage. So if you find your CPU is unstable at, let's say, .78 volts with a multiplier of 6, try the next highest of .796. Increase the voltage in these small increments until you find a point at which the CPU is stable. If you want to include a safetly margin (recommended to reduce the possibility of a BSOD), bump the up the voltage to the next highest one.

(Here we see NHC open and set to a voltage to test and Orthos stress testing)
If you are unlucky enough to get a BSOD after NHC sets the voltage and you can't get into Windows without a BSOD, don't freak out - there is a simple fix. When you reboot, hit F8 to enter safe mode. NHC will not start with Windows in safe mode. We are going to edit the NHC config file so that when we reboot into Windows normally, we will not have to deal with a BSOD. When you get into safe mode, open up My Computer and navigate to the folder in which NHC is installed. When you get there locate the settings.xml file. Right click on it and select edit. Now you should be in Notepad. Hit Ctrl + F and search for CPUVoltage. We are going to be editing the "<Value0 value="2" />" line (see image below). Value0 corresponds with the first multiplier listed. Since we have the "Use only Multiplier #1 and Voltage #1" line checked, this is the line we want to edit.

(The part we are editing in in the red box)
The part we are editing is the "2". The 2 corresponds to the third voltage value (list starts at 0). So to change it, just increase the number by 1. In this case, I would change the number to 3. The edited line will now read "<Value0 value="3" />". Save the file and reboot. You should no longer have the BSOD problem. Chances are you will end up having to do this once (maybe twice). If you are going to BSOD at a voltage though, chances are it will be when NHC is doing it's quicktest.
When you find the magical voltage, write it down in a new column. We need to change that first spot. Increase the multiplier to the next highest, which will probably be 8. Don't worry though. If you switch to a multiplier not supported by NHC's Dynamic Switching, you will be notified. One you have changed it to the next multiplier (in my case 8 ) look at your original voltages you wrote down. Like before, start off decreasing it by .03 - .05 volts. Do the same procedure as above to find the minimum voltage.
(This is what NHC will tell you if you select a multiplier not supported by Dynamic Switching)
To give you an idea of what you might expect in terms of undervolting, here is what I got with my 1.5ghz Dothan (0.7v is the lowest available in NHC):
6x Multiplier: 0.700 volts (Stock: .98 or .97 - I forgot to write it down)
8x Multiplier: 0.700 (Stock: 1.052)
10x Multiplier: 0.732 (Stock: 1.116)
12x Multiplier: 0.812 (Stock: 1.180)
15x Multiplier: 0.908 (Stock: 1.276)
Every CPU is a little different. You may not get as low voltages as me, or you might get lower than me. The Dothan CPUs can undervolt a little better than the Banias from what I have seen.
To give you an idea of the temperature differences caused by undervolting, here is a little test I did. Sadly, the T40's fan is controlled exclusively by the BIOS, so I can't use an application to set the fan to a specific speed. I used Orthos to stress the CPU and raise the temperature.
1.5ghz idle @ stock voltage: 44c (fan on minimum)
1.5ghz idle @ 0.908 : 32c
1.5ghz load @ stock voltage: 60c (fan on high)
1.5ghz load @ 0.908 : 45c (fan on minimum)
Yes - 15c difference between load temps. Just think of the power you are saving by not having to run that fan on high!
If you have any questions, please do not hesitate to ask. This guide can be adapted to most other systems with little differences as most things still apply. For example, the ATI Powerplay feature will not apply to the T60 series because they use Intel integrated graphics or a nVidia GPU. nVidia does have a feature similar to Powerplay (which is called PowerMizer), which NHC can also integrate with.
To see some usage time stats check out my 2nd post (2 posts down).
Enjoy!